
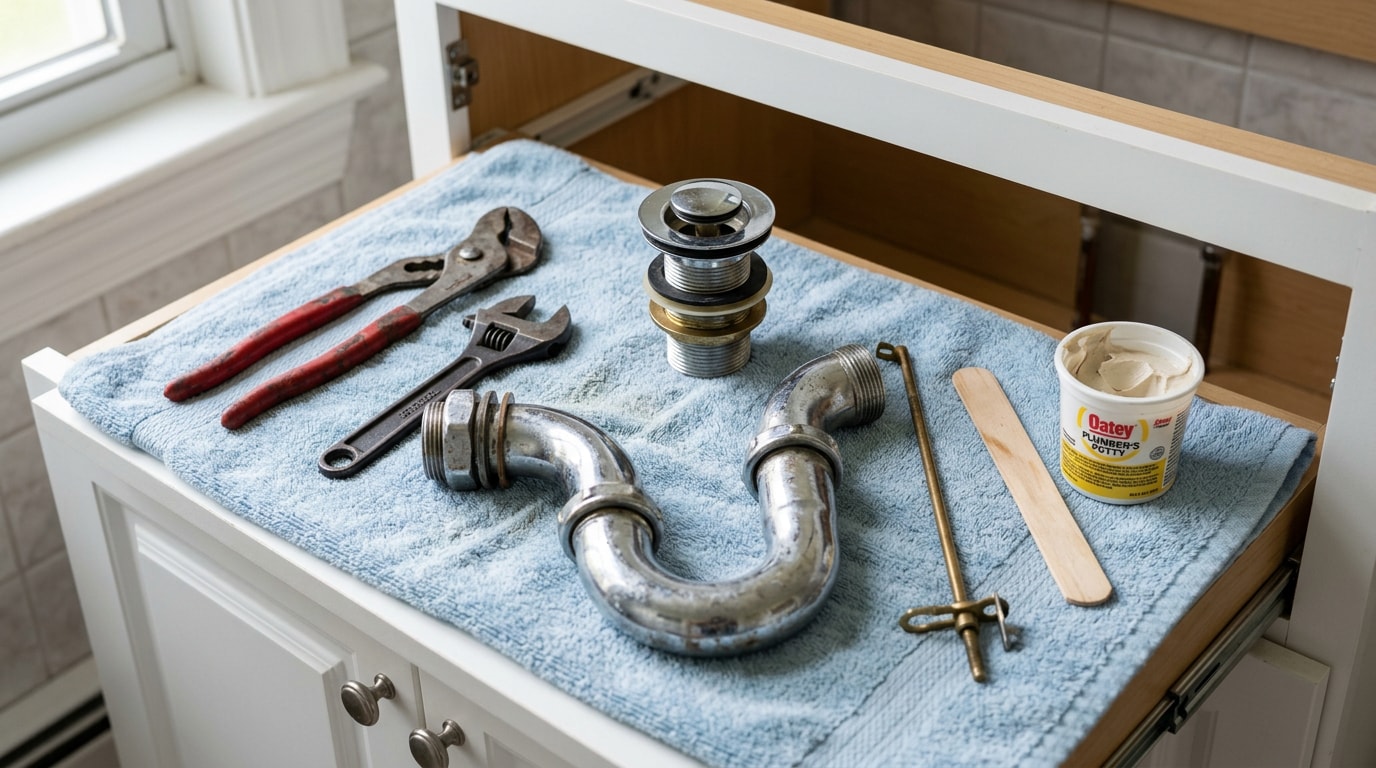
Need to know how to remove a bathroom sink drain in Dublin, TX, without cracking the basin or stripping a fitting? Most jobs come apart with a basin wrench, a bucket, and about 30 minutes, even on the older galvanized connections still common in Erath County homes. This guide walks through every step, flags the parts that fail when you rush them, and tells you exactly when it's time to stop and call a crew.
Tools and Materials You'll Need
Gather everything before you crawl under the cabinet. None of this is specialty equipment.
- Basin wrench
- Channel-lock pliers
- Bucket
- Flathead screwdriver
- Flashlight
- Plumber's putty (check the table below before you grab silicone instead)
- Old towel or rag
- Penetrating oil
If the nuts look rusted solid or fused before you even touch a wrench, that's your cue to stop guessing and get a free estimate instead of forcing a part that's going to crack.
Step-by-Step: How to Remove a Bathroom Sink Drain
The order below is the same regardless of the sink's age or brand, from the stopper down to the flange.
1. Turn Off the Water Supply
Find the shut-off valves under the basin and turn both clockwise until they stop.
Test the faucet to confirm the water is fully off. Clear out the cabinet and lay down a towel before you loosen anything.
Not sure which valve controls what, or where your emergency shut-off actually is? Our plumbing valves guide for De Leon, TX breaks down valve types and locations for homes built across this part of Texas.
2. Remove the Drain Stopper
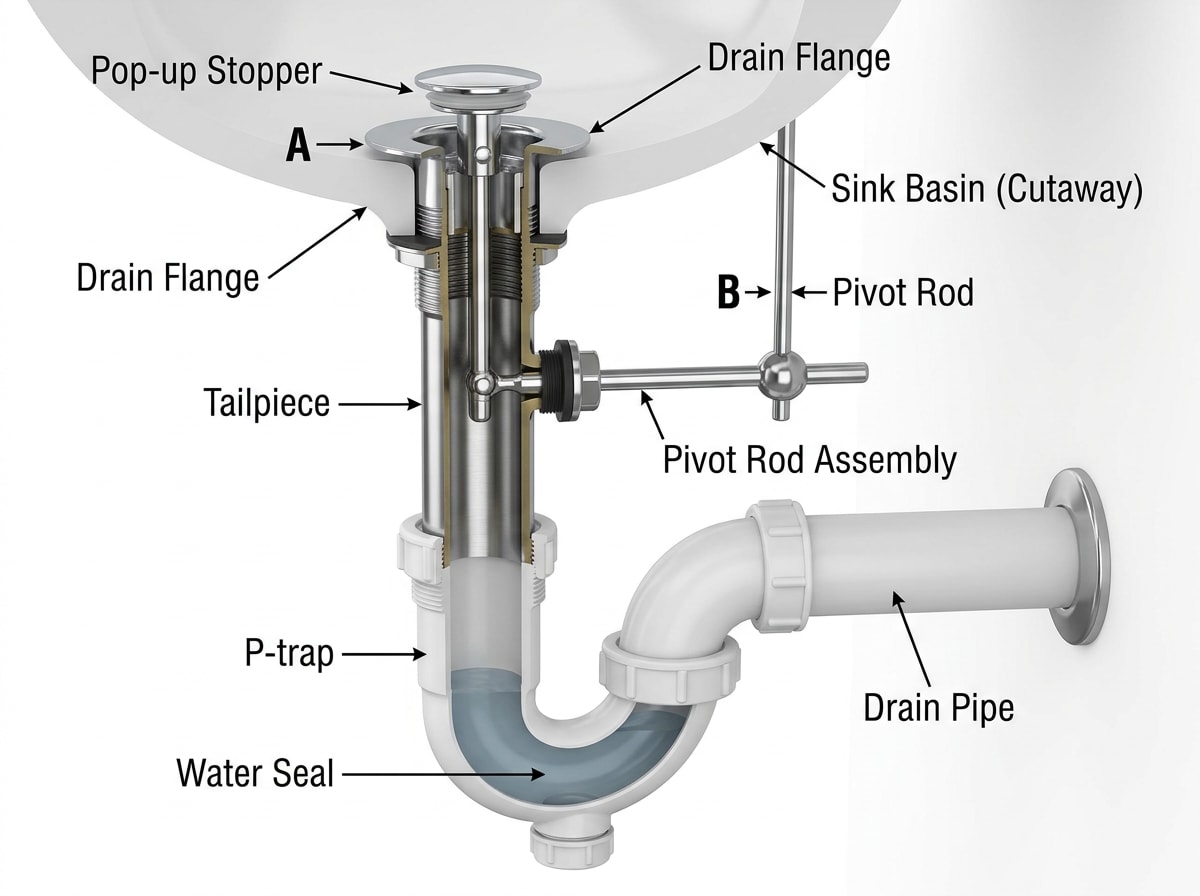
Reach under the sink, find the horizontal pivot rod running into the tailpiece, and unscrew the retaining nut holding it. Slide the rod out, then lift the stopper from above.
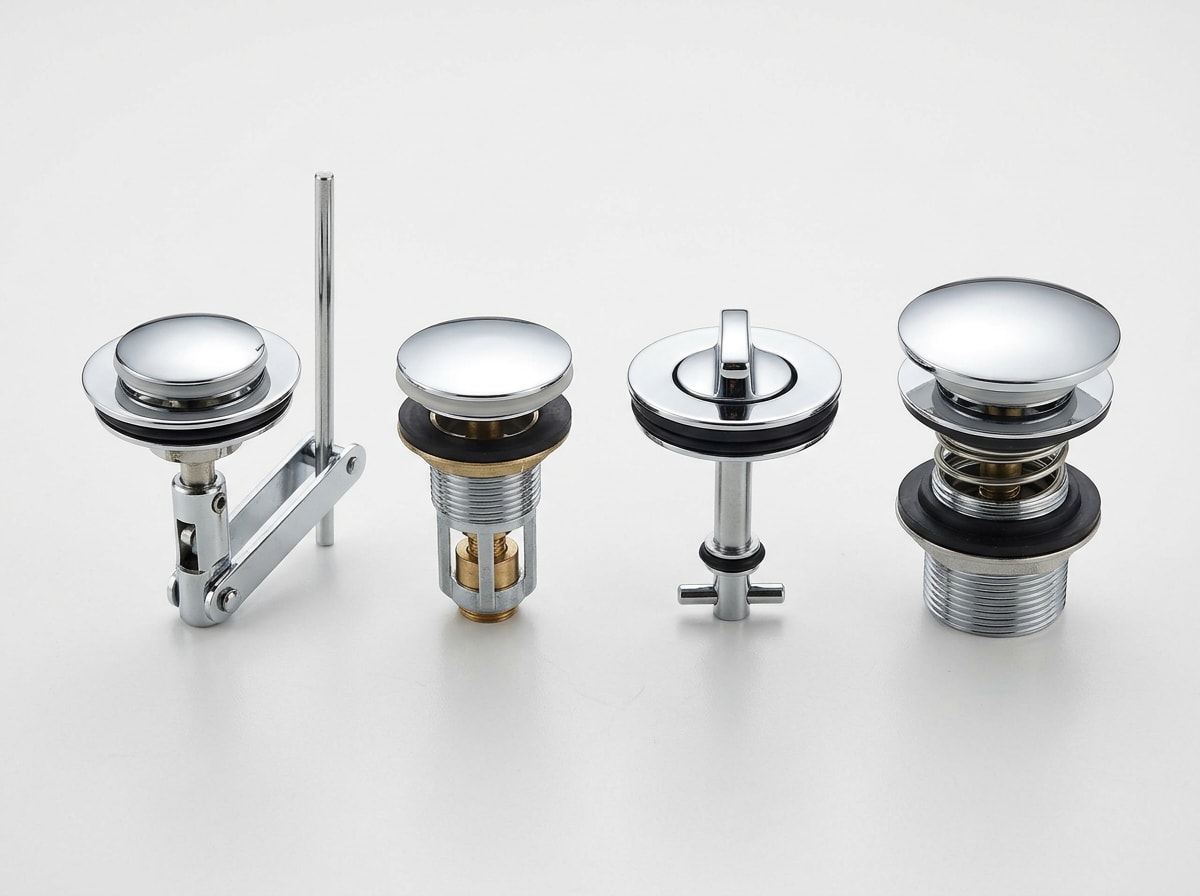
Not every bathroom sink uses this mechanism. Check which type you actually have before assuming something's broken:
- Pop-up (pivot rod): described above
- Push-pull or flip-it: twists or pulls free by hand, no rod involved
- Toe-touch: releases with a light press
Manufacturer instructions confirm this layout. One official Moen installation sheet shows the pivot rod threading through the drain body and seating against the putty bead at the base, which is why that nut has to come off before the stopper will lift free (Moen lavatory drain instructions).
3. Loosen and Remove the P-Trap
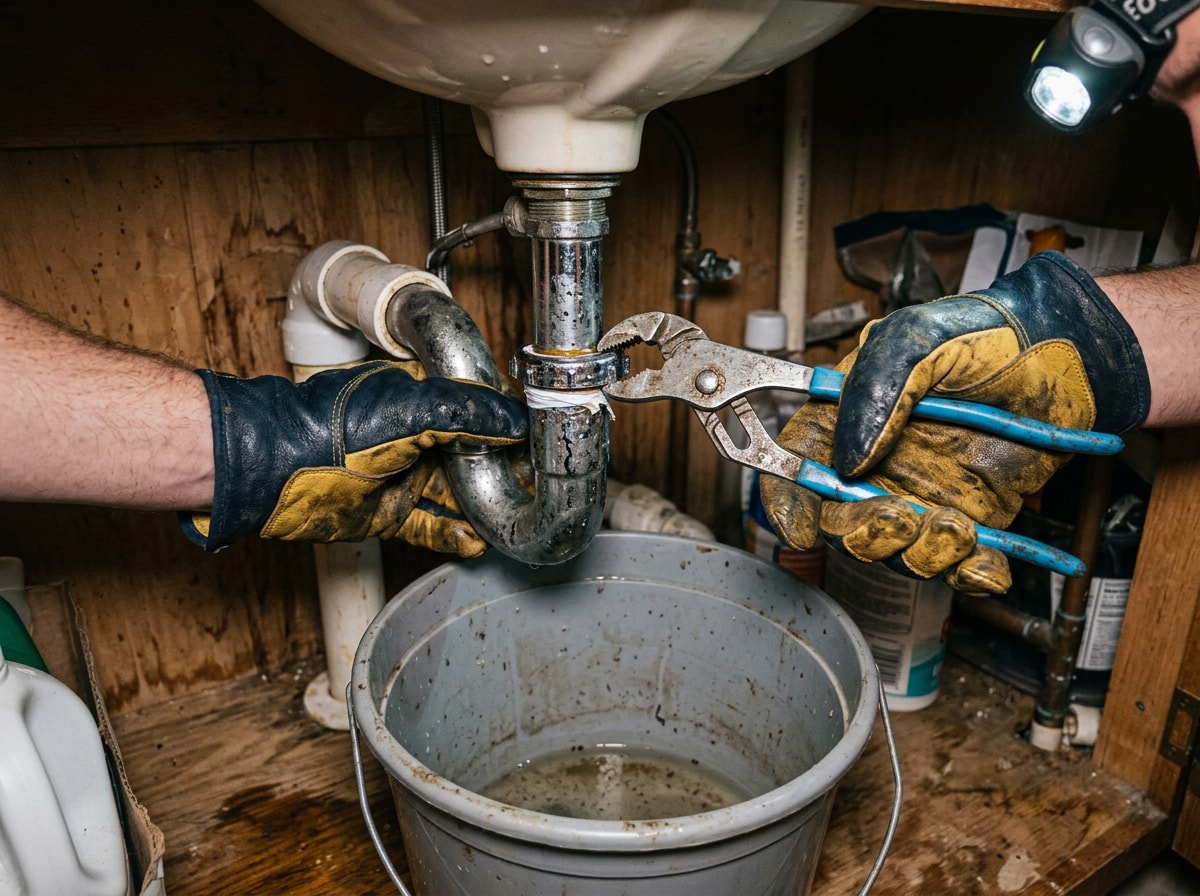
Place a bucket under the trap, hand-loosen the slip nuts on both ends of the curved pipe, and slide it free. Expect some standing water and debris.
That water isn't just leftover grime. Plumbing codes require every fixture trap to hold a liquid seal, and the International Plumbing Code sets that seal depth at a specific range so it blocks sewer gas without fouling the line: each fixture trap shall have a liquid seal of not less than 2 inches and not more than 4 inches , which is why a P-trap should never sit bone-dry for long after you reinstall it.
4. Disconnect the Tailpiece
Hold the drain body steady with a drain wrench from above while unscrewing the slip nut connecting the tailpiece below. Bathroom sinks don't always have a separate tailpiece the way kitchen sinks do. If yours runs straight from the drain body into the trap, skip this step.
5. Remove the Drain Flange
Twist the flange counterclockwise by hand, or with pliers wrapped in a rag to protect the finish. Old putty or silicone usually holds a stubborn seal, so run a putty knife around the edge to break it loose before the flange lifts out.
Common Mistakes to Avoid
A handful of errors show up on nearly every DIY drain removal:
- Forcing a corroded nut instead of letting penetrating oil soak for 10 to 15 minutes first. This is the fastest way to strip a fitting or crack an old basin.
- Skipping the water shut-off and flooding the cabinet.
- Reusing a worn gasket instead of a new one.
- Putting putty on the wrong surface. Not every material accepts it. See the table below before you reseal.
If a nut won't budge even after soaking and you're worried about cracking a decades-old basin, that's a reasonable point to stop. Get a free estimate rather than risk the sink itself.
Plumber's Putty vs. Silicone: Which Should You Use?
Standard plumber's putty can stain natural stone and some plastics over time, and the manufacturer builds a separate "stain-free" formula specifically for that reason. According to Oatey, the stain-free version is formulated so it "can be used safely without staining the following materials; Granite, Marble, Quartz, Sandstone, Corian" (Oatey plumber's putty FAQ), which regular putty is not guaranteed to do.
| Factor | Plumber's Putty | Silicone Sealant |
|---|---|---|
| Best on | Metal, ceramic, standard porcelain basins | Natural stone, composite, and acrylic basins |
| Removability | Comes apart clean for future service | Harder to remove once cured |
| Cure time | None, ready immediately | Needs curing time before use |
| Stone/composite risk | Can stain unless labeled "stain-free" | Safe on granite, marble, quartz |
Check your sink's material before you reseal. A $4 tube of the wrong sealant is a cheap mistake; a stained granite vanity top is not.
When a Slow Dublin Sink Drain Signals a Bigger Problem
A full drain removal fixes a stuck stopper or a corroded flange. It does not fix a drain line problem further down the system.
In our excavation and septic work across Erath County, we've opened plenty of cabinets under older Dublin sinks where the slip nuts had fused from years of mineral buildup, and the real issue traced back past the trap to an aging drain line or a septic connection that needed a closer look, not another trip to the hardware store. If a bathroom sink keeps clogging within weeks of a fresh drain cleaning, or multiple fixtures in the house are slow at once, that pattern usually points past the fixture itself.
That's where drainage solutions or a septic site evaluation from a local crew makes more sense than repeating the same DIY fix. Henderson Land Services works throughout Dublin, TX on exactly this kind of job. Get a free estimate if your drain trouble feels bigger than one stuck flange.
Simple Maintenance to Prevent the Next Clog
A full teardown isn't always necessary. Pouring a mix of salt and hot water down the drain helps emulsify light grease and soap buildup before it hardens into a real clog.
It's a two-minute habit between deeper cleanings, and it costs nothing.
Final Thoughts
Removing a bathroom sink drain is a manageable weekend project for most homeowners with basic tools and a little patience. If the nuts are corroded solid, the assembly is fused, or the pipe behind it all turns out to be the real issue, calling a crew that works on drainage and septic systems every day beats forcing a stuck part and cracking something expensive.
For a deeper look at sewer line and septic troubleshooting in this region, our plumbing and sewer repair guide for Stephenville, TX covers the warning signs worth knowing before a small drain problem turns into a bigger one.
FAQ
How much does it cost to remove and replace a bathroom sink drain?
Hiring a plumber typically runs $150 to $300 for a straightforward job, though pricing varies by region and how corroded the existing parts are. DIYing it costs little beyond the tools listed above.
Do I need to remove the metal ring (flange) just to take the stopper out?
No. The stopper lifts free once the pivot rod is disconnected. The flange only needs to come out if you're replacing the entire drain assembly.
How is a bathtub stopper different from a bathroom sink stopper?
Bathtub stoppers are usually toe-touch or lift-and-turn styles, not pivot-rod pop-ups. The mechanism is different enough that sink-specific steps won't apply directly, so confirm which type you have first.
What if the slip nuts won't budge even with penetrating oil?
Let the oil sit longer, up to 30 minutes on badly corroded fittings, and try again with channel-lock pliers for better grip. If it still won't move, stop before you crack the pipe or the basin and call a plumber.
Can I use silicone instead of plumber's putty on any sink?
Only if the sink material calls for it. Granite, marble, quartz, and some plastics do better with silicone or a stain-free putty formula. Standard porcelain and metal sinks typically do fine with regular plumber's putty.
Why does my bathroom sink drain slowly even after I clean the trap?
A clean trap that still drains slowly often means the clog or restriction is further down the line, not in the fixture itself. That's a sign to have the drain line checked rather than repeating the same cleaning.